

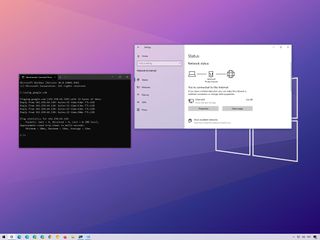
How To Reset Internet Settings In Windows 10
Although Windows 10 updates are of import to patch security vulnerabilities and improve the organization performance, information technology is a known fact that quality and feature updates can introduce unintended problems.
Typically, one of the most common issues after installing an update is related to network connectivity. For example, wearisome speeds, unreliable or consummate loss of connectivity using a wireless or wired connection resulting in problems connecting to the internet and network resources, such as shared printers and folders.
Regardless of the reason, when a device cannot connect to the local network or net, after a contempo update of Windows 10, there are many ways that Microsoft recommends to prepare the consequence.
In this Windows 10 guide, we volition walk yous through several ways to resolve common network connection issues after installing an update on your device.
- How to fix common network problems later update on Windows 10
- How to fix connectivity using Network troubleshooter
- How to reset network stack using Command Prompt
- How to reset network adapter using Settings
- How to update network adapter commuter using Device Director
- How to rollback network adapter commuter using Device Manager
- How to uninstall network adapter commuter using Device Director
- How to disable security apps to fix network bug on Windows 10
- How to uninstall recent update to fix network problems on Windows 10
How to set common network problems later on update on Windows ten
If a quality update breaks the network connection, you tin can follow some basic troubleshooting steps to resolve the problem quickly.
Reboot computer
Although it might exist obvious, it's not for everyone. Typically, a simple reboot can fix nearly mutual problems, including problems connecting to the network and the internet.
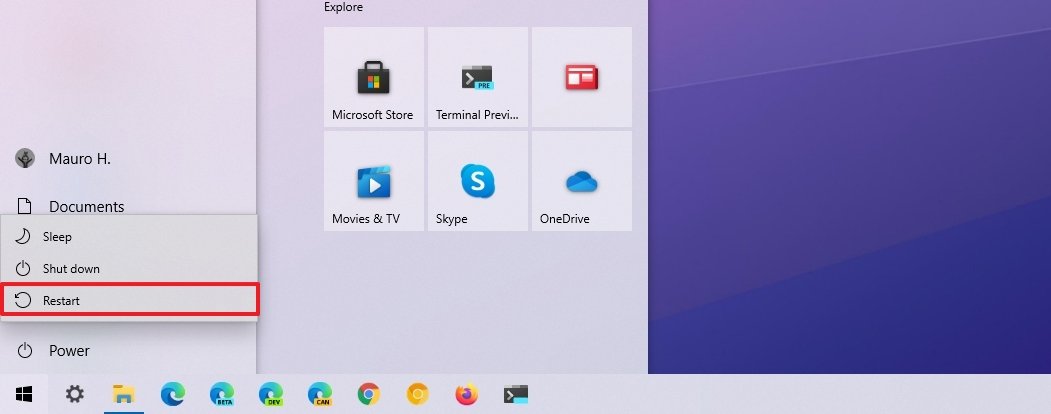
To restart a device, use these steps:
- Open Start.
- Click the Power option.
- Select the Restart option.
Once you complete the steps, open up the web browser and ostend the net is working, loading a website upon restart.
If the network icon in the notification area shows an active connection, but y'all cannot open a particular website, try to load a unlike site every bit the problem could be with the website. You can besides try using a different browser to ostend the problem is not the application.
Confirm network settings
The adjacent step involves using command lines to ostend the problem is not something happening between the device and the router.
To check if the Windows 10 network configuration is working, utilise these steps:
- Open up Start.
- Search for Command Prompt and click the meridian upshot to open the console.
- Type the post-obit command to discover out the IP accost of the router and press Enter:
ipconfig
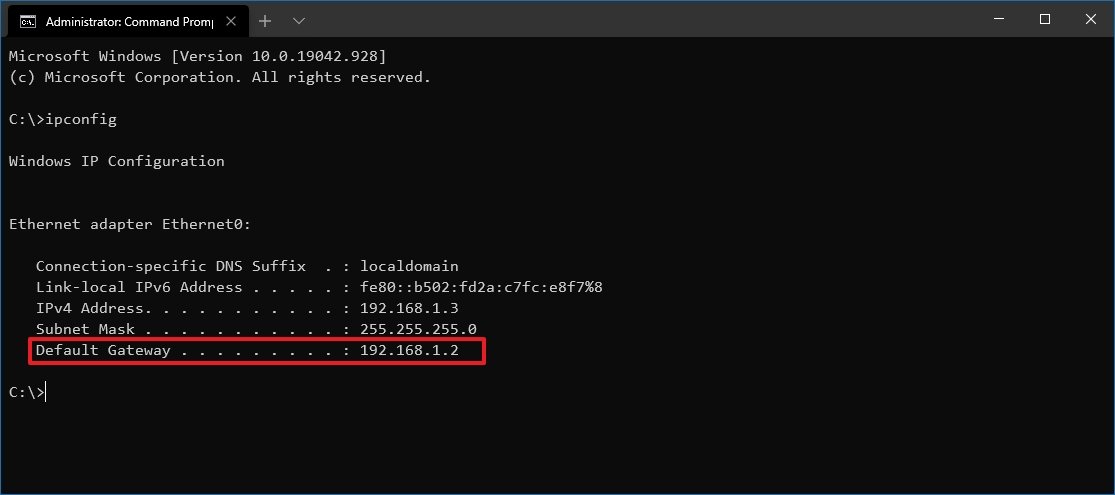
- Confirm the "Default Gateway" accost that should be the address of the local router.Quick tip: In domicile networks, most routers use the 192.169.1.1 or 192.168.2.1 address. However, depending on the configuration or Internet access provider (ISP), the accost might be different.
- Type the post-obit control to determine if the router is reachable and printing Enter:
ping ROUTER-IPThis instance tests the connectedness between the computer to the router with the 192.168.1.one accost:ping 192.168.1.1In the command, remember to change the 192.168.ane.ane for the router's IP address.Quick tip: You lot tin also use theping 127.0.0.onecommand to exam if the networking stack is installed correctly and working on the computer.
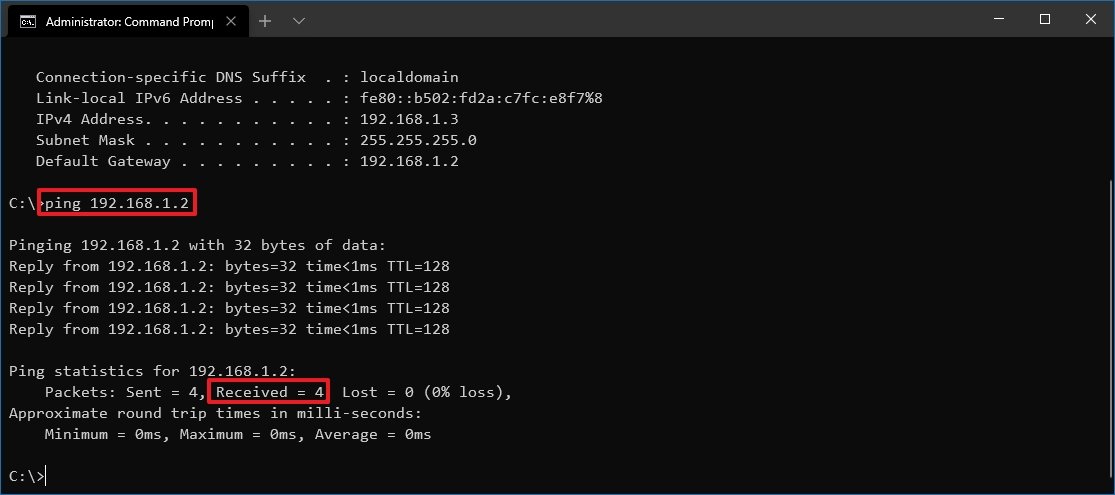
- Confirm successful replies without packet loss in the output.
Later on you complete the steps, if the "Packets" field returned with "four" successful replies, the router's connexion is working, indicating that the trouble could lie in the connection between the router and ISP. Or it could be the case that the Internet service provider is currently experiencing issues.
If you lot can access the internet from your phone or some other computer connected to the same network, then the problem could be the device in question.
Enable Wi-Fi interface
If in that location is no connectedness to the internet, the wireless interface may not exist enabled.
To check and enable a Wi-Fi interface, use these steps:
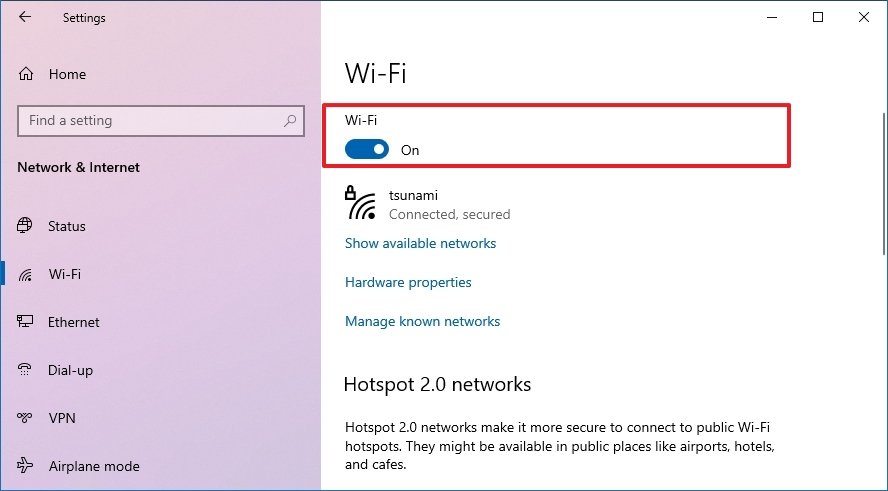
- Open Settings.
- Click on Network & Internet.
- Click on Wi-Fi.
- Plough on the Wi-Fi toggle switch.
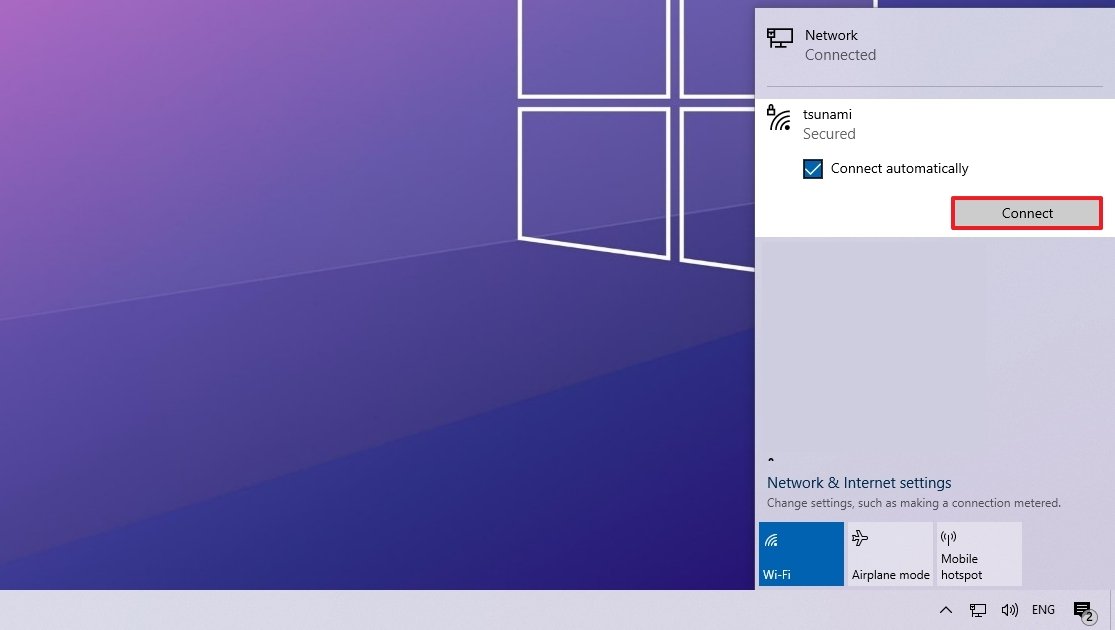
Alternatively, you tin also click the "Not connected" network icon from the taskbar notification area and click the Wi-Fi button.
If there is a physical push in the device, brand certain to turn it on to enable the interface.
Reconnect Wi-Fi connection
On laptops, the trouble could be the wireless adapter or indicate, which you might exist able to resolve by disconnecting and reconnecting to the network.
To reconnect to a Wi-Fi network, use these steps:
- Open Settings.
- Click on Network & Internet.
- Click on Wi-Fi.Quick tip: If the wireless section is missing, Windows 10 can no longer detect the network adapter, which could betoken a driver or hardware trouble.
- Turn off the Wi-Fi toggle switch.
- Plough on the Wi-Fi toggle switch.
- Click the Show available networks pick.
- Select the wireless network from the listing.
- Click the Connect button.Quick tip: Almost all modern routers allow wireless connections using 2 ring frequencies, including the ii.4GHz and 5GHz, which could appear as separate networks. If you see both networks, you can endeavour connecting with a unlike frequency to come across if that resolves the trouble. You lot can use this guide to larn fifty-fifty more than ways to connect to a wireless network.
- Confirm the wireless password (if applicative).
- Click the Next button.
In one case you complete the steps, you should be able to connect to the network and the internet.
You can also create a study of the wireless connection history, which can help diagnose the consequence.
Renable network adapter
Sometimes updates tin can inadvertently alter settings without the user's consent. For example, information technology could happen that an update may disable the adapter or a specific feature, such as Plane mode, blocking the connexion to the net.
If the network adapter is not present in the Settings app, it could be a driver problem, or the adapter may exist disabled.
To check and enable a network adapter on Windows 10, use these steps:
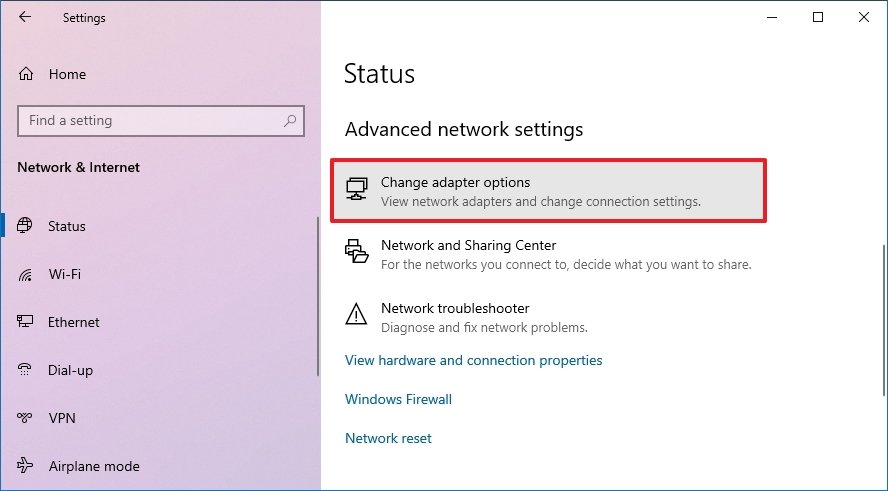
- Open Settings.
- Click on Network & Internet.
- Click on Status.
- Under the "Avant-garde network settings" section, click the Alter adapter options pick.
- Right-click the adapter and select the Enable pick.
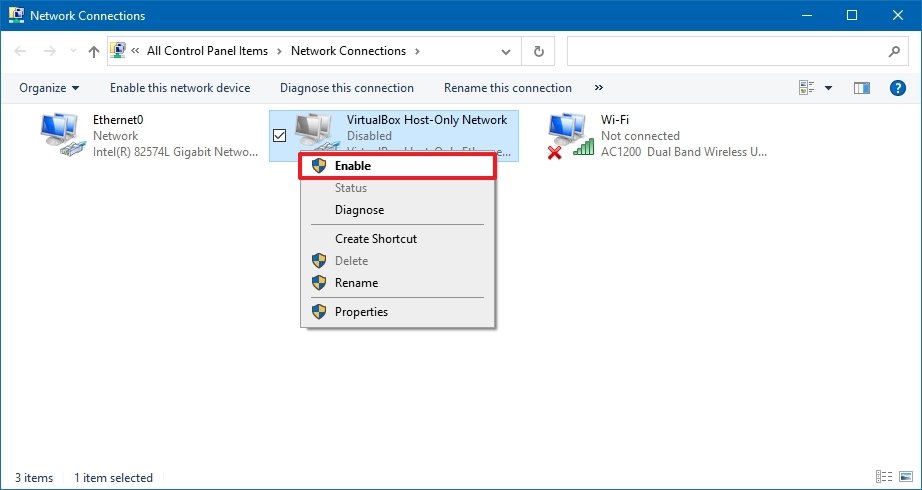
Subsequently y'all complete the steps, the Wi-Fi or Ethernet adapter will enable and reconfigure automatically.
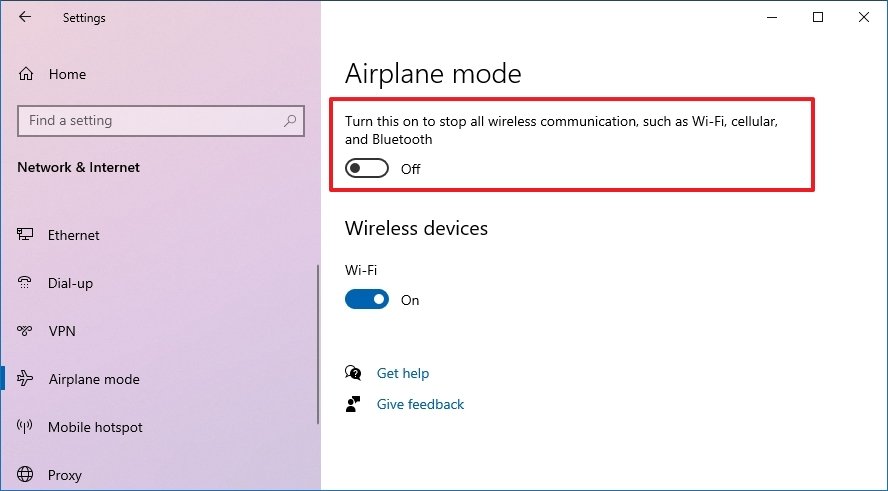
Disable Aeroplane mode
If the "Aeroplane" mode is enabled, you lot won't exist able to connect to the network. In the example that the update turned on the feature automatically or you forgot information technology was enabled, y'all need to make certain to disable it.
To plow off Airplane mode on Windows 10, use these steps:
- Open up Settings.
- Click on Network & Internet.
- Click on Airplane fashion.
- Turn off the Airplane mode toggle switch.
- (Optional) Restart your device.
Alternatively, you can also click the aeroplane icon in the taskbar and click the Airplane mode button.
Recreate Wi-Fi profile
Every time you connect to a wireless network, the credentials, security, and other settings are stored in a contour. In the case that you are having problem connecting to a particular network, it could be a problem with the profile.
To set this problem, yous tin can delete and recreate the contour using these steps:
- Open Settings.
- Click on Network & Internet.
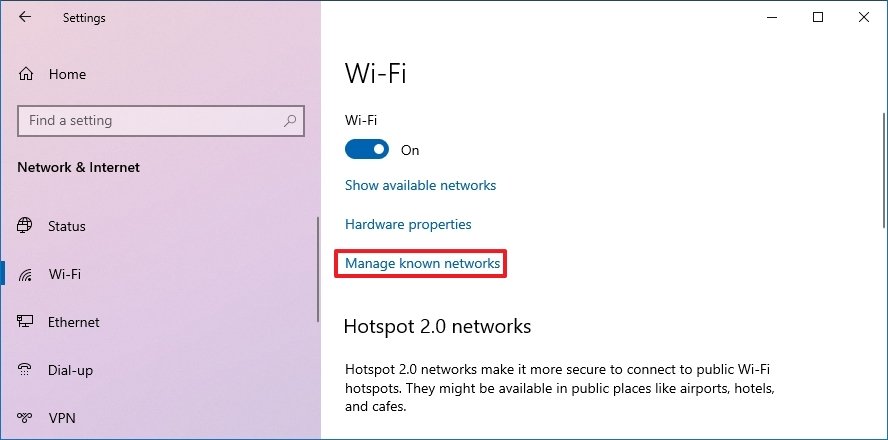
- Click on Wi-Fi.
- Under the "Wi-Fi" section, click the Manage known networks selection.
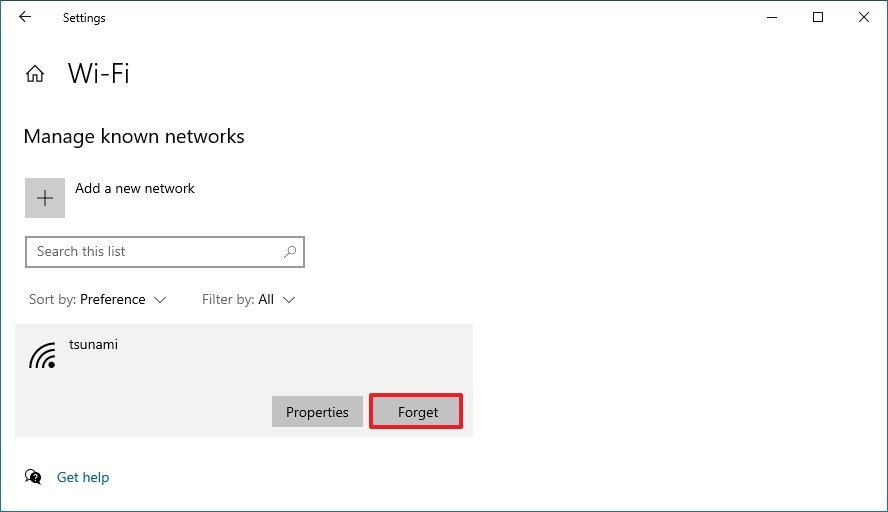
- Select the Wi-Fi network with the trouble.
- Click the Forget button.
- Click the network icon from the notification area in the taskbar.
- Select the wireless network with access to the net.
- Click the Connect button.
- Confirm the network security key.
- Click the Adjacent button.
- (Optional) Click the Yes button if you want to make the device discoverable in the network.
After you lot consummate the steps, use the web browser to confirm the cyberspace is working again.
It is also possible to manage a Wi-Fi network with the netsh control-line tool, and in this guide, you lot tin learn more about the process.
Reboot router
If the computer does non seem to be the trouble, you can too restart the router, which can sometimes set up many common connectivity issues.
To restart the home router, use these steps:
- Locate the router.
- Unplug the ability cord.
- Wait at to the lowest degree threescore seconds.
- Reconnect the ability string.
Once you complete the steps, allow 3 to v minutes for the router to start and check the connection.
Ping the connectedness
Opening the spider web browser and loading a website can confirm whether the internet is working. Yet, y'all can besides use the ping command tool to check the connectedness more reliably.
To test the network connection with the ping control, use these steps:
- Open up Kickoff.
- Search for Command Prompt and click the pinnacle result to open up the console.
- Type the post-obit command to test the connectivity and press Enter:
ping google.comQuick tip: We are using "Google.com" equally an example, but you can use whatsoever online service to examination the connection, for instance, "Bing.com."
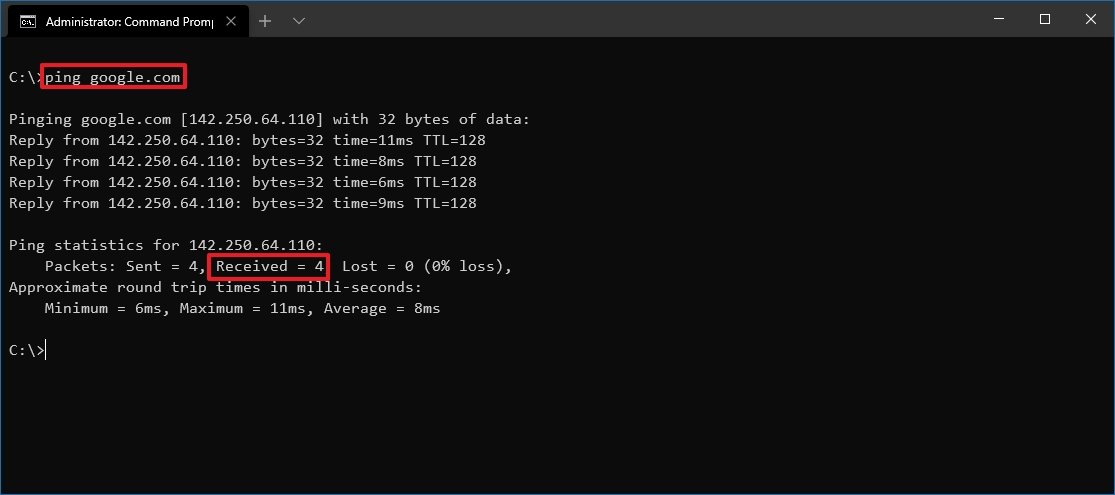
- Confirm successful reply without packet loss in the output.
Once you complete the steps, if you run into 4 successful replies, it indicates that the internet connexion is working.
When using a wired connectedness, information technology is wise to alter cables and port on the switch to eliminate the possibility of problems with those elements.
In addition to the ping command, Windows 10 offers many other tools to troubleshoot and fix network problems. In this guide, you lot can learn eight of them.
How to fix connectivity using Network troubleshooter
Windows 10 also includes a troubleshooter tool that yous can use to diagnose and repair common networking problems speedily.
To utilize the network troubleshooter on Windows 10, employ these steps:
- Open Settings.
- Click on Update & Security.
- Click on Troubleshoot.
- Nether the "Recommended troubleshooting" section, click the Additional troubleshooters selection.
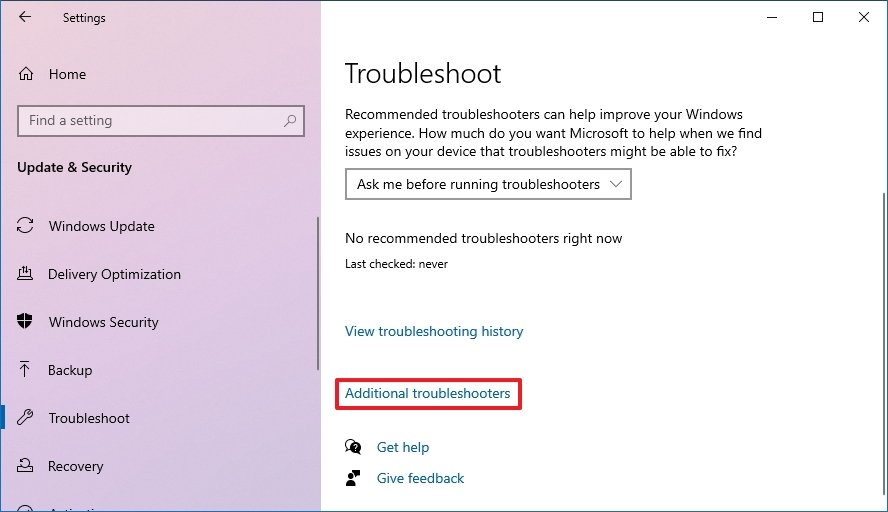
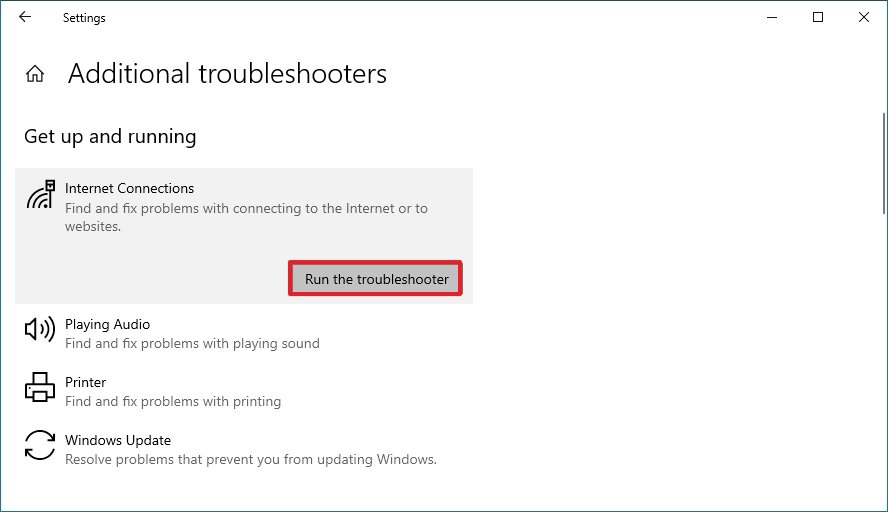
- Under the "Get upwards and running" department, select the Internet Connections troubleshooter.
- Click the Run the troubleshooter push button.
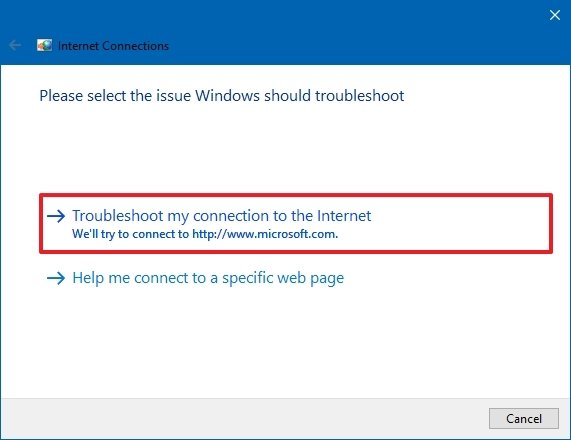
- Select the Troubleshoot my connection to the internet option.
- Select the Effort these repairs equally an administrator option (if applicative).
- Keep with the on-screen directions (if applicative).
Later on you complete the steps, the troubleshooter will browse and resolve whatever connectivity trouble.
How to reset network stack using Command Prompt
You lot tin can likewise effort resetting the TCP/IP stack and clearing any DNS information on Windows 10 to resolve the network problem.
To reset the network stack with commands, utilize these steps:
- Open Beginning.
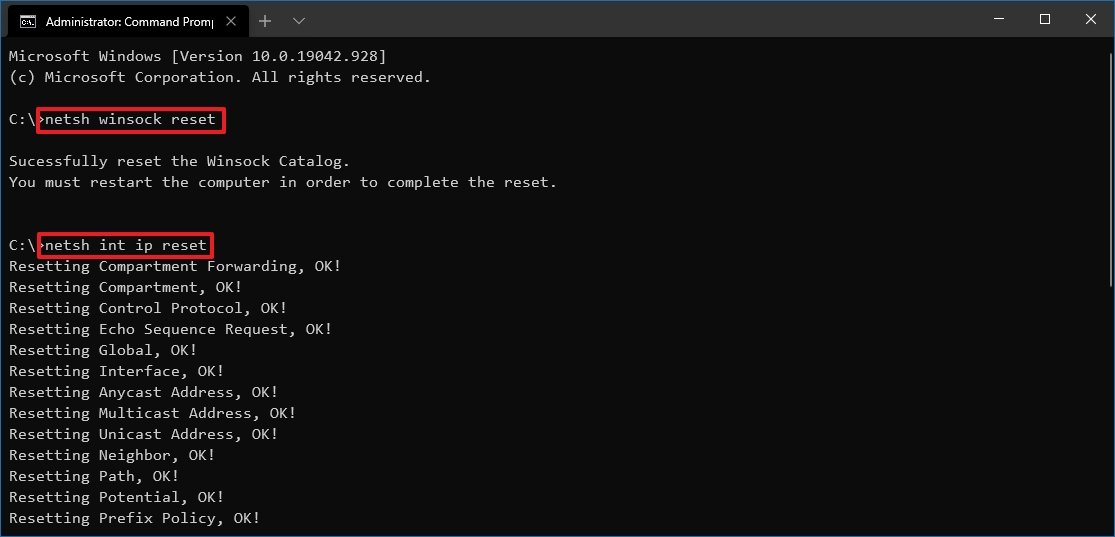
- Search for Command Prompt, right-click the meridian result, and select the Run as administrator option.
- Type the following command to reset the components that handles network requests and press Enter:
netsh winsock reset - Blazon the following command to reset the internet protocol (IP) stack and press Enter:
netsh int ip reset
- Type the following command to clear the electric current networking configuration and press Enter:
ipconfig /release - Type the following control to reconfigure the network settings automatically and printing Enter:
ipconfig /renew
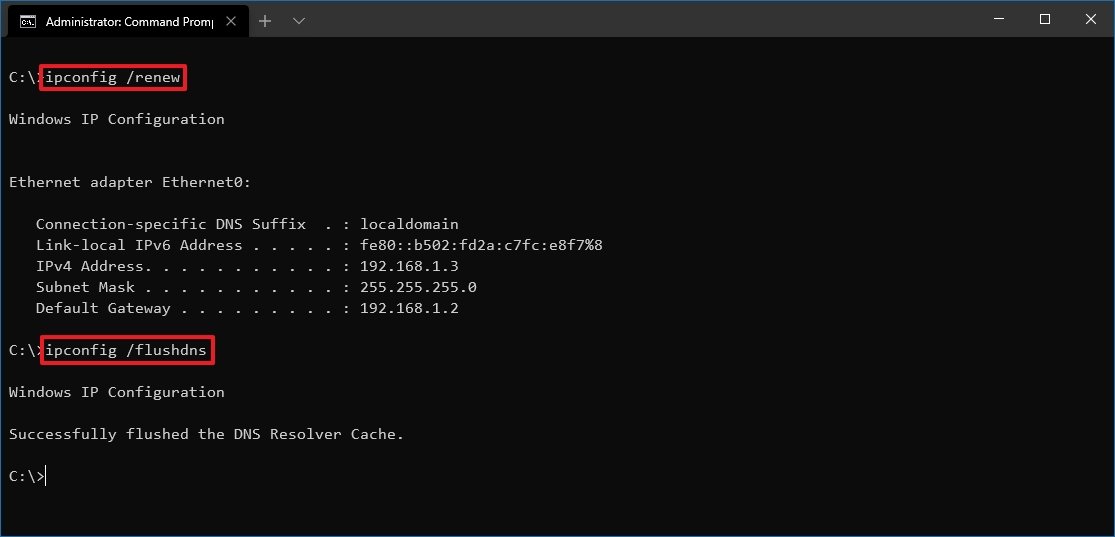
- Type the following command to clear the Domain Name Organisation (DNS) information buried and press Enter:
ipconfig /flushdns - Restart your estimator.
Once you consummate the steps, launch the web browser and confirm whether the internet connection is working.
How to reset network adapter using Settings
If you are notwithstanding dealing with networking problems, Windows 10 has an option to reset all the Wi-Fi and Ethernet network adapters to set up most problems.
To reset all the network adapters on Windows ten, employ these steps:
- Open up Settings.
- Click on Network & Internet.
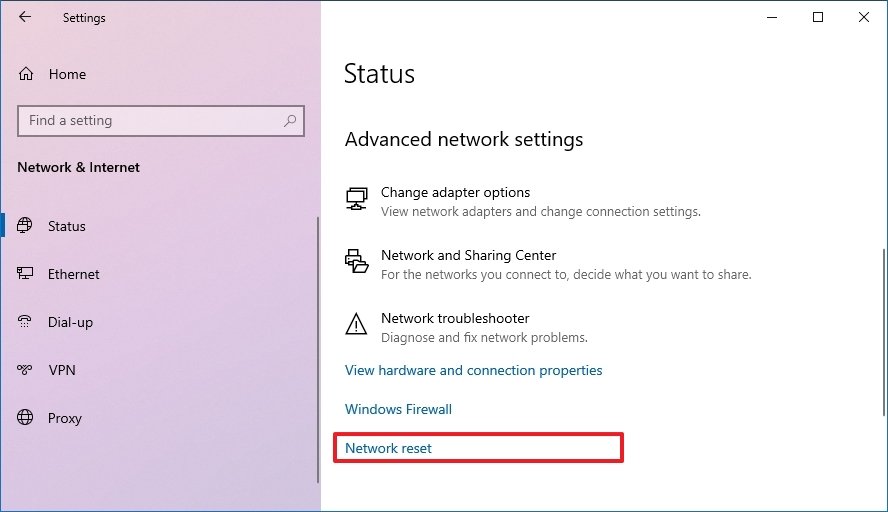
- Click on Status.
- Under the "Advanced network settings" section, click the Network reset option.
- Click the Reset now button.
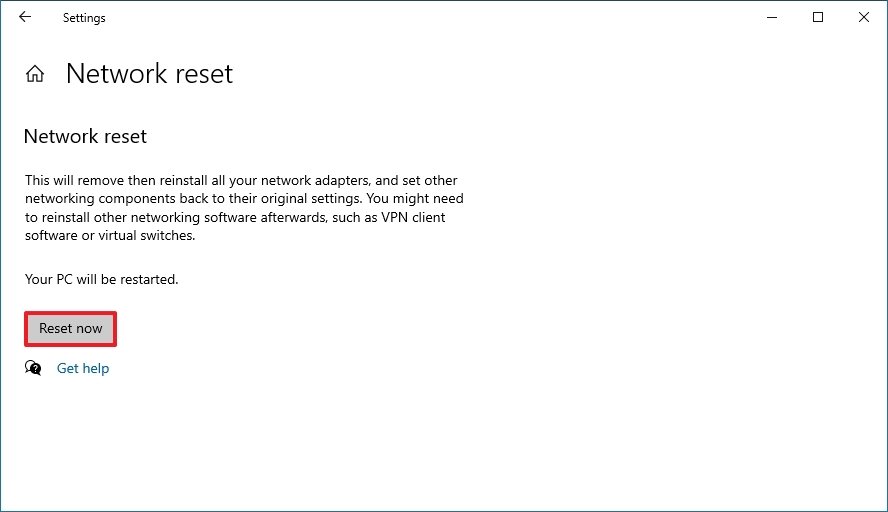
- Click the Yep button.
After you complete the steps, the device will restart automatically, and after the reboot, you lot should be able to connect to the network and internet.
The process of resetting the networking settings means that you will need to re-enter the security key once again. Also, you lot will have to reconfigure other networking software, such every bit VPN clients, equally necessary.
How to update network adapter driver using Device Manager
Sometimes, an older version of the network driver tin crusade compatibility problems with a Windows x update. Ordinarily, you lot can set this by updating the driver to the latest version.
Update network adapter online
If the device is experiencing unreliable connectivity, simply it is nevertheless possible to connect to the internet, you can check for commuter updates using Windows Update.
To install a newer version of the network adapter driver, apply these steps:
- Open Settings.
- Click on Update & Security.
- Click on Windows Update.
- Click on View optional updates selection.
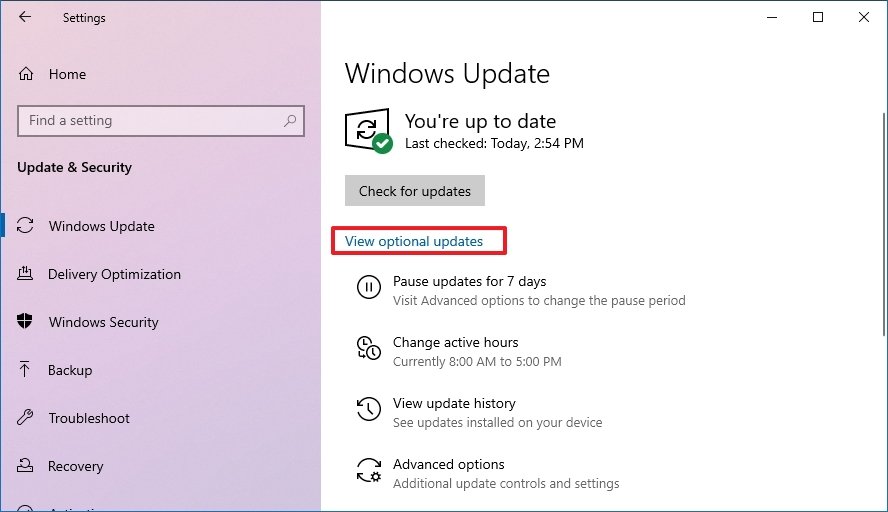
- Under the "Driver updates" section, select the newer network commuter.
- Click the Download and install button.
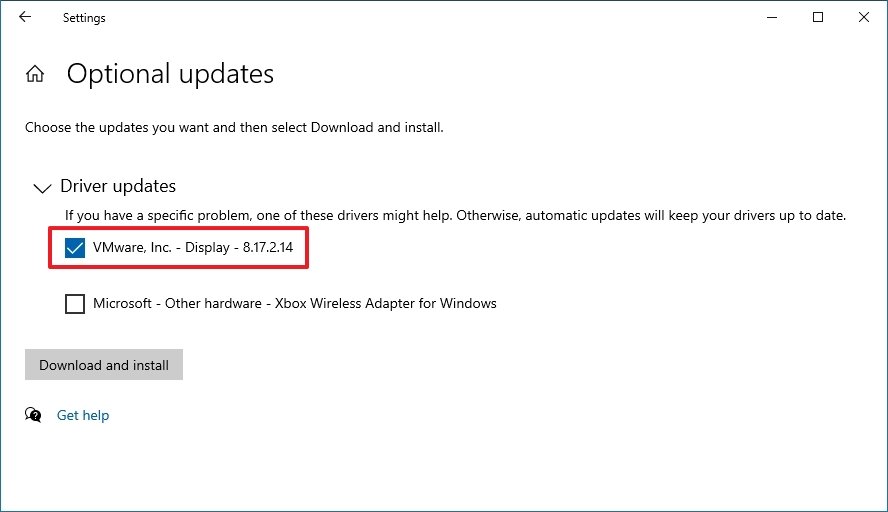
Afterwards you complete the steps, the new driver volition download and install automatically to fix the problem. If you lot cannot find an update, so Windows Update does not have more contempo drivers, in which example, y'all may demand to update the adapter manually (see steps below).
Update network adapter offline
If you cannot connect to the cyberspace, you will take to download the driver manually from your manufacturer support website using some other device and bring it over using a USB flash drive. You should always apply the manufacturer instructions to consummate the process, but yous can e'er use the steps beneath.
To update a network adapter on Windows x, connect the USB wink drive with the extracted files, use these steps:
- Open Start.
- Search for Device Manager and click the top outcome to open the app.
- Expand the Network adapters branch.
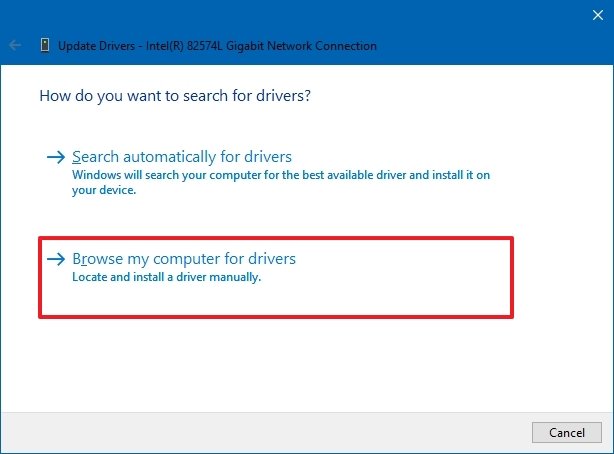
- Correct-click the adapter with the problem and select the Update driver option.

- Click the Browse my computer for drivers option.
- Click the Browser push button.
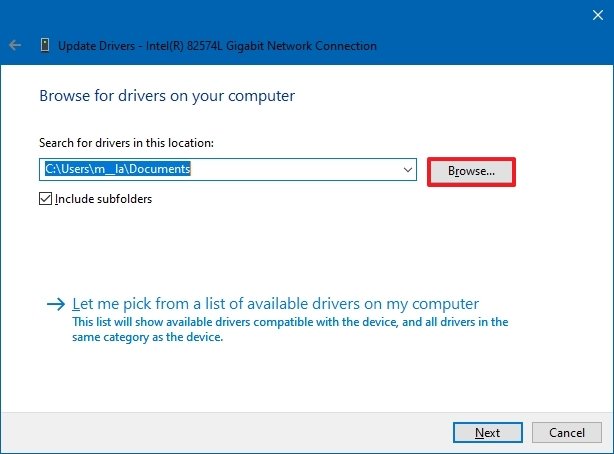
- Select the binder location with the driver bundle.
- Click the OK button.
- Click the Next push.
- Continue with the on-screen directions (if applicable).
Once you complete the steps, the new update will install to fix the compatibility problem.
How to rollback network adapter driver using Device Manager
If the problem started afterward applying a driver update, you could roll back to the previous version to temporarily fix the network problem until a newer update becomes available.
To restore a previous version of a driver, utilize these steps:
- Open Start.
- Search for Device Director and click the top result to open the app.
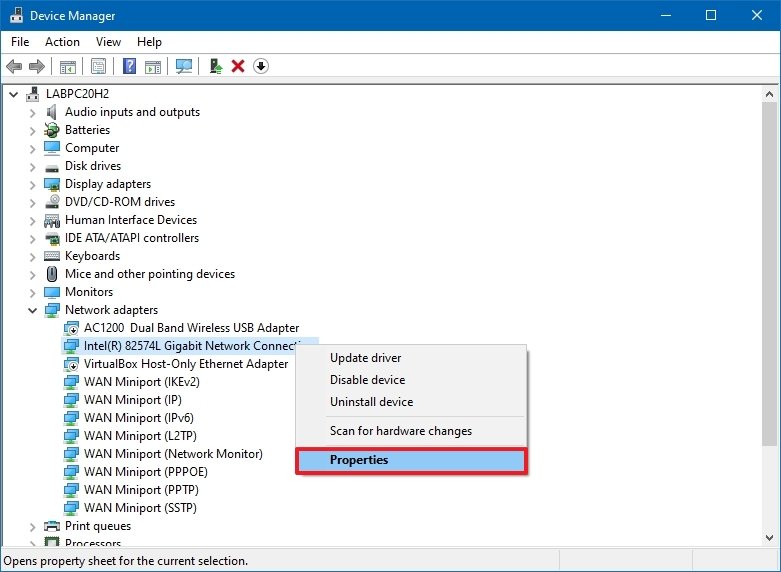
- Expand the Network adapters branch.
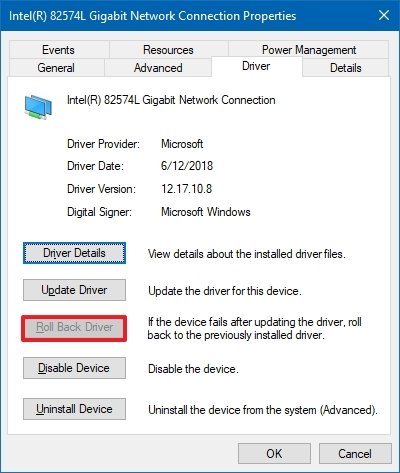
- Correct-click the adapter with the problem and select the Properties option.
- Click the Driver tab.
- Click the Roll back commuter push.Quick tip: If the button is grayed out, it means that the system does not have a backup of the commuter.
- Click the OK button.
- Select a reason why you are rolling back (select any option).
- Click the Yes push.
- Restart your computer.
Once you complete the steps, examination the connection with the ping command or load a website with your preferred web browser.
How to uninstall network adapter driver using Device Manager
When the problem occurs after applying a cumulative system update, it could point a abuse with the commuter or the update made unwanted changes. In this specific situation, you lot can remove the driver manually, and and so Windows ten volition effort to reinstall it automatically.
To remove a network adapter driver, apply these steps:
- Open up Start.
- Search for Device Manager and click the top result to open up the app.
- Expand the Network adapters co-operative.
- Correct-click the Wi-Fi or Ethernet network adapter and select the Uninstall device option.
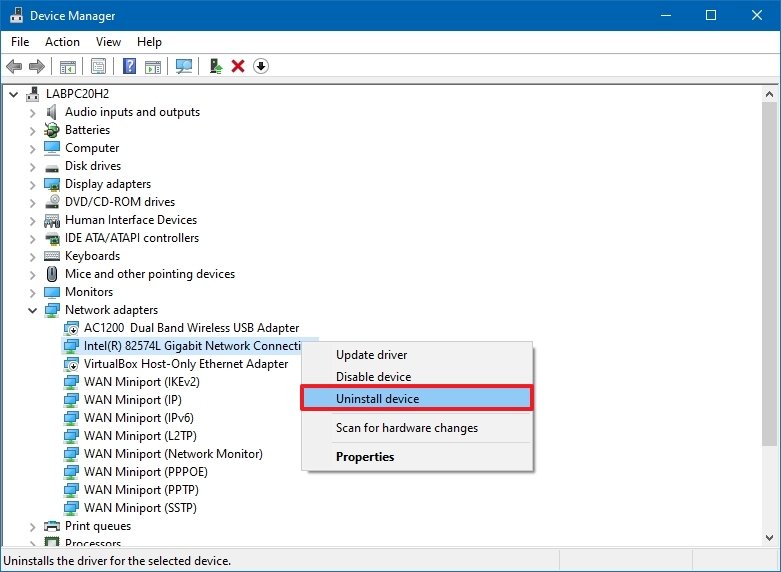
- Click the Uninstall button.
- Restart your estimator.
Afterward you complete the steps, Windows 10 will discover and reinstall the driver automatically, fixing the network problem.
If the arrangement cannot find the appropriate driver, y'all tin use the previous steps to download and install the network adapter manually.
How to disable security apps to fix network problems on Windows 10
On Windows 10, sometimes, 3rd-party security software (such as antivirus and firewall) can prevent the device from accessing the internet. If this is the instance, you tin can determine if the application is the trouble by temporarily disabling it and testing the network connection.
The steps below volition aid yous to disable the security features congenital into Windows 10. If yous have a different solution, and so check your software support website for more specific details.
Disable Microsoft Defender Antivirus
To temporarily disable Microsoft Defender on Windows 10, use these steps:
- Open Start.
- Search for Windows Security and click the peak outcome to open up the app.
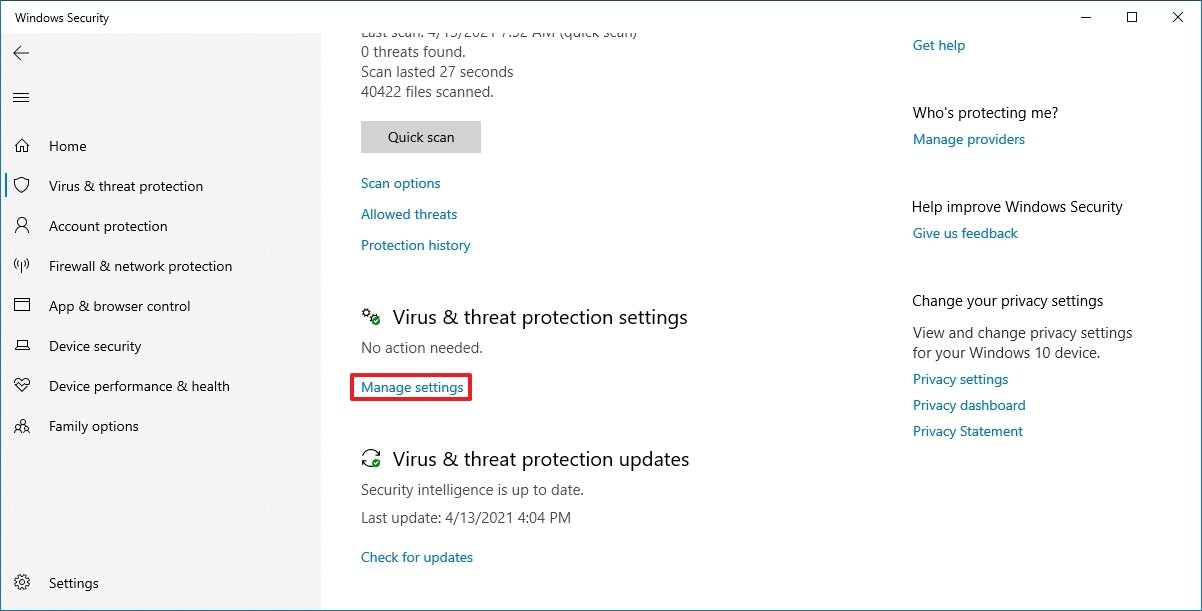
- Click on Virus & threat protection.
- Under the "Virus & threat protection settings" section, click the Manage settings choice.
- Turn off the Real-time protection toggle switch.
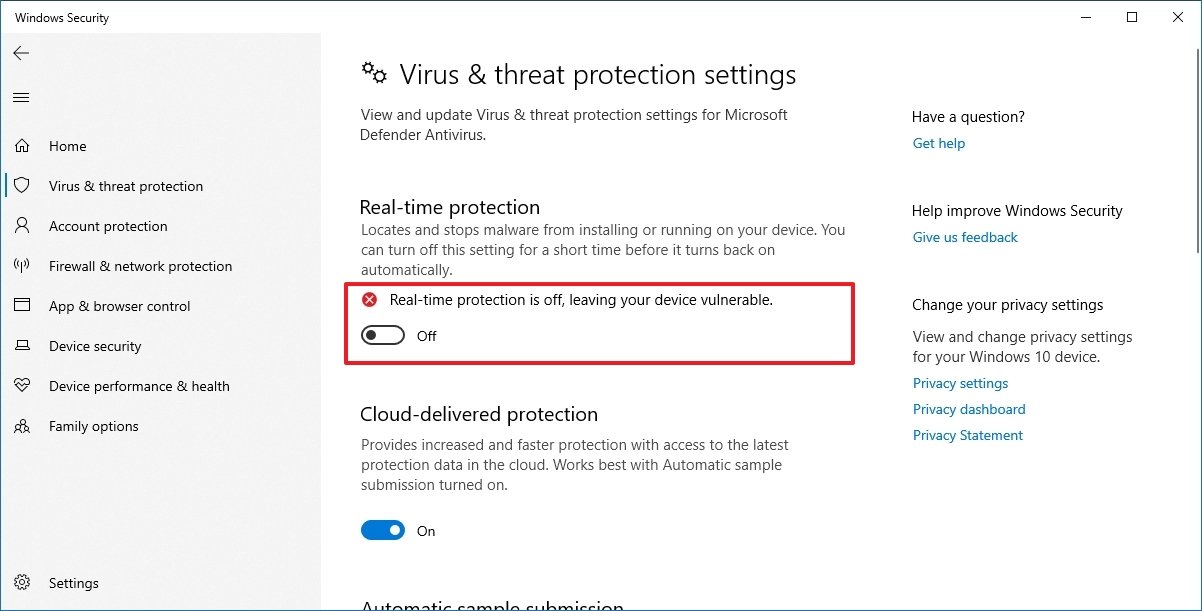
Once you consummate the steps, test the connection going to "Bing.com" or "Google.com" on your device.
You tin always revert the changes past restarting the figurer or enabling the Real-time protection option again on stride No. five.
Disable Microsoft Defender Firewall
To temporarily disable the Microsoft Defender Firewall, employ these steps:
- Open Offset.
- Search for Windows Security and click the top upshot to open up the app.
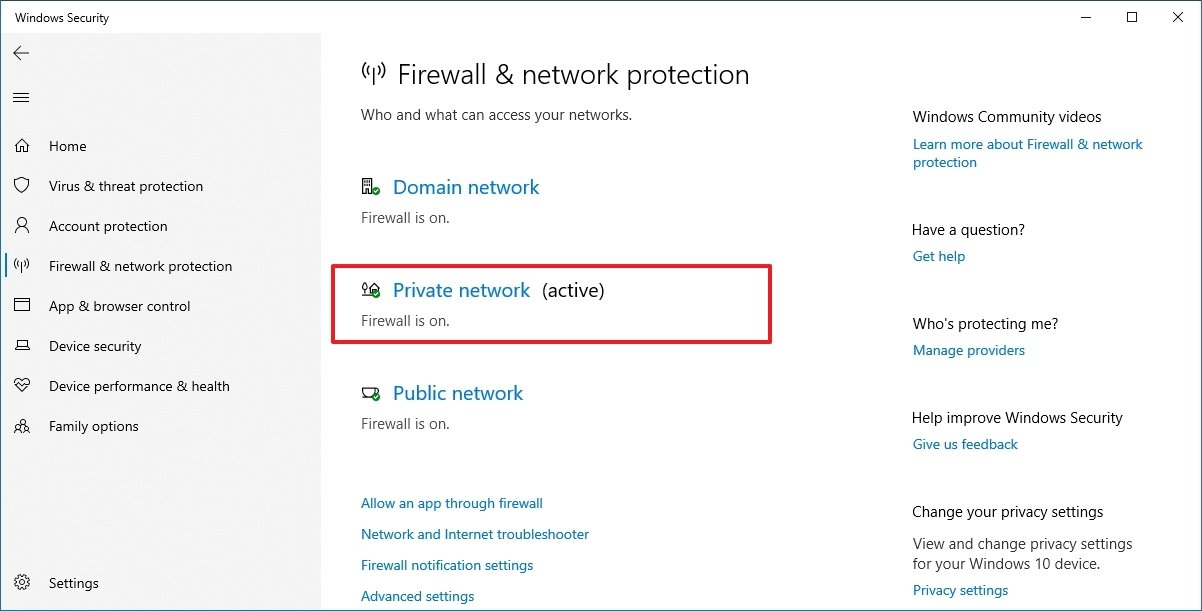
- Click on Firewall & network protection.
- Click the (active) network.
- Plow off the Microsoft Defender Firewall toggle switch.
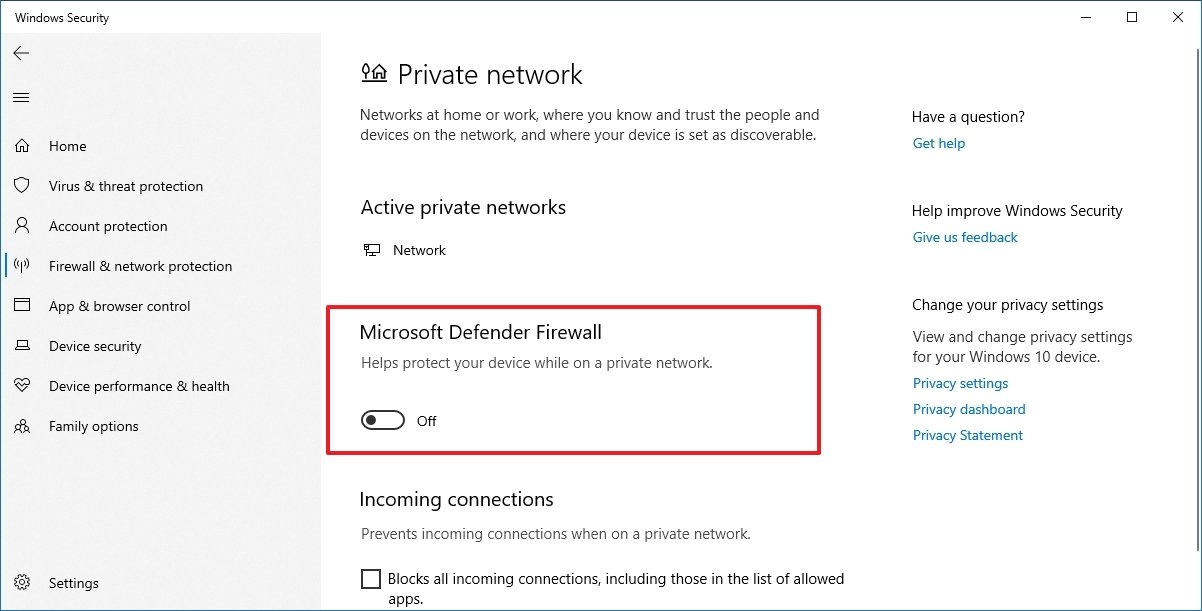
Afterwards you lot consummate the steps, ostend whether the internet is working by loading a website with your web browser.
You tin can enable the firewall again using the same instructions outlined in a higher place, but on stride No. 5, make sure to turn on the Microsoft Defender Firewall toggle switch.
How to uninstall recent update to fix network problems on Windows x
Although system updates are meant to resolve bug and improve the experience, information technology is not uncommon to see buggy updates through Windows Update that can crusade connectivity problems. If you suspect a contempo update is causing networking issues, you lot can remove it to mitigate the trouble until a newer update becomes available.
Uninstall quality update
To uninstall a quality update on Windows 10, utilize these steps:
- Open Settings.
- Click on Update & Security.
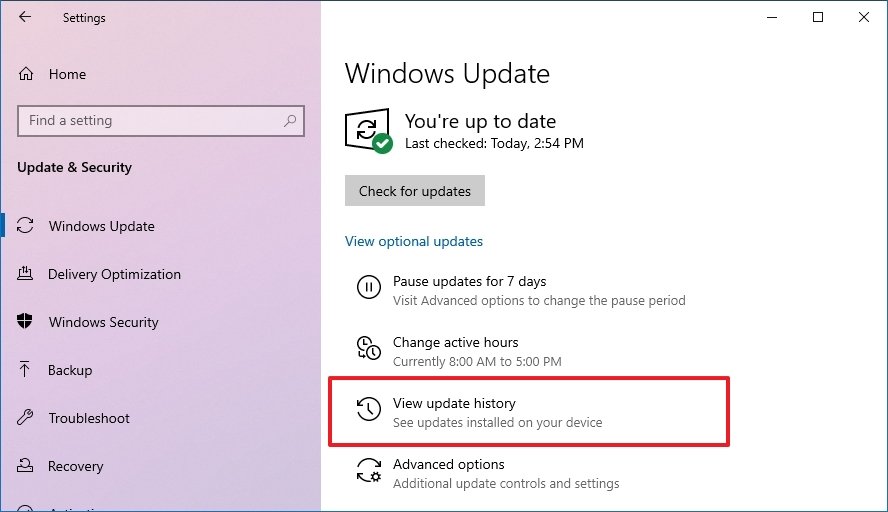
- Click on Windows Update.
- Click the View update history push button.
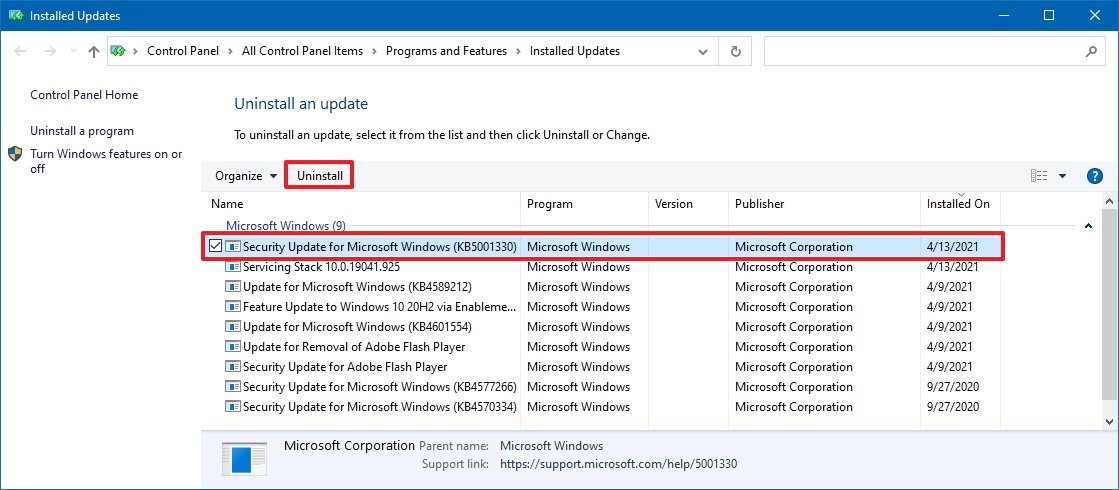
- Click the Uninstall updates pick.
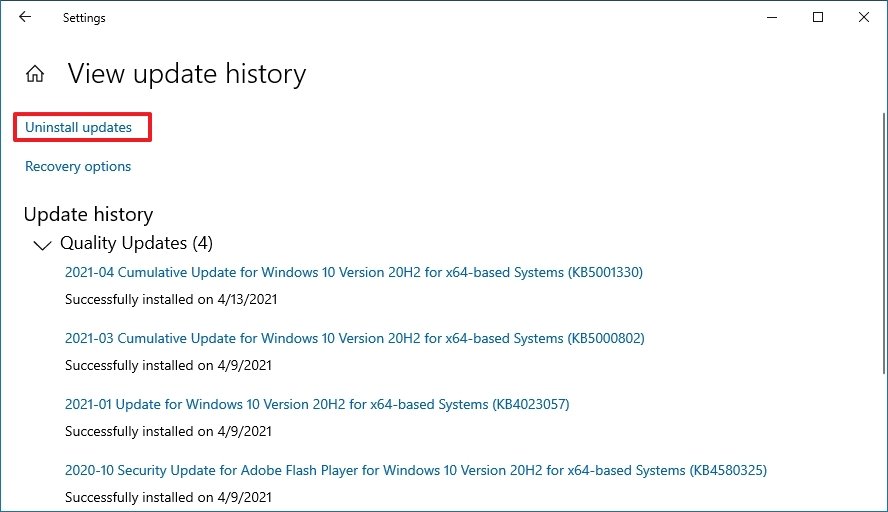
- Select the most recent update causing the network trouble on Windows 10.
- Click the Uninstall button.
- Click the Yes push.
- Click the Restart now button.
Once yous complete the steps, Windows 10 volition remove the update to let the network adapter to work once again.
Uninstall feature update
When the trouble occurs after installing a major update (such as the October 2020 Update), y'all can as well remove the update to roll back to the previous version, but the steps will be slightly dissimilar.
Of import: Although rolling dorsum to a previous version is a non-destructive process, it is recommended to create a temporary total backup of your PC in case something goes wrong. Also, the option to scroll back is only available during the first ten days after upgrading. After this fourth dimension, yous won't exist able to disengage the changes unless you re-install the version yous desire using a clean installation.
To uninstall a feature update, employ these steps:
- Open Settings.
- Click on Update & Security.
- Click on Recovery.
- Under the "Go back to a previous version of Windows x" section, click the Get started push.

- Cheque whatever of the reasons available.
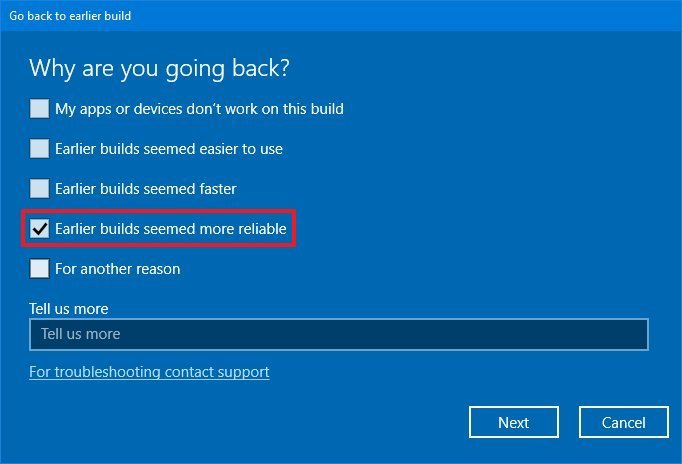
- Click the Adjacent button.
- Click the No, thanks button.
- Click the Side by side push button.
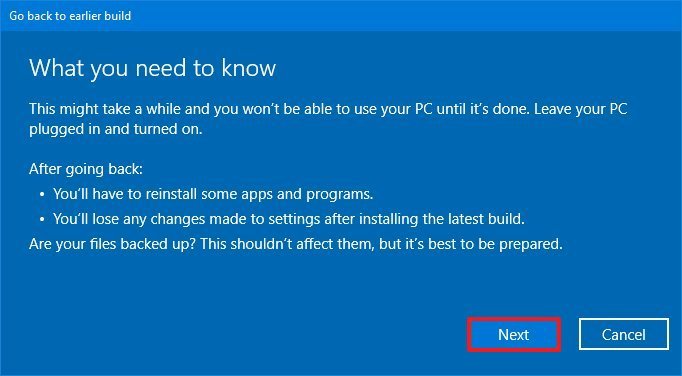
- Click the Adjacent push button again.
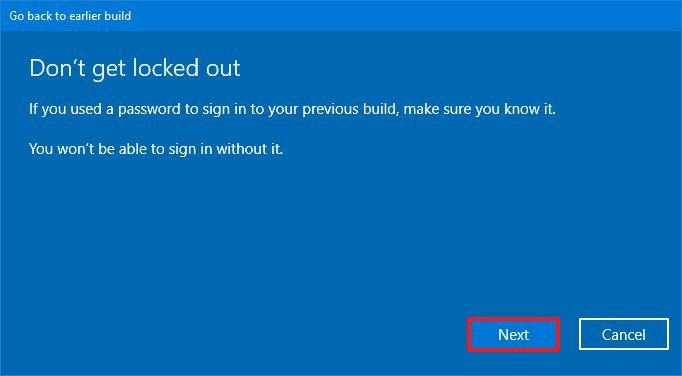
- Click the Become back to earlier build push.
After you consummate the steps, Windows 10 will curl back to the previous setup when the network was working correctly.
More Windows 10 resource
For more helpful manufactures, coverage, and answers to common questions about Windows 10, visit the following resources:
- Windows ten on Windows Central – All yous need to know
- Windows x help, tips, and tricks
- Windows 10 forums on Windows Primal
Source: https://www.windowscentral.com/how-regain-internet-access-after-installing-update-windows-10
Posted by: schneidereself1954.blogspot.com
0 Response to "How To Reset Internet Settings In Windows 10"
Post a Comment